Physical Examination
Marina Boruk
Frank E. Lucente
The otolaryngologist is concerned with the medical and surgical aspects of diseases of the head and scalp, ears, face (skin and skeleton), nose, paranasal sinuses, nasopharynx, oral cavity, oropharynx, larynx, laryngopharynx, and neck. Examination of patients with problems in these regions is based on a thorough medical history, a complete general examination including other areas of the body, and a knowledge of the ancillary tests that supplement the otolaryngologic examination. The otolaryngologist must often correlate findings and interpretations with those of other specialists involved in managing disorders of this region.
An organized approach to the physical examination prevents significant findings from being overlooked. The examination described is particularly pertinent to the care of patients under-going a general otolaryngologic examination. When the patient has symptoms related to one particular structure, such as the ear or the larynx, examination of that area should be reserved for last so that coincident abnormalities will not be missed.
INSTRUMENTS AND ILLUMINATION
Of the four general techniques of examination—inspection, palpation, percussion, and auscultation—the otolaryngologist relies most heavily on the first two because many of the structures to be evaluated are located deep within the skull, upper airway, or upper gastrointestinal tract. Adequate illumination is extremely important. Three types of lighting generally are used: (1) handheld, battery-operated otoscope; (2) head mirror with a light bulb placed near the patient’s head; and (3) head light. A nasopharyngolaryngoscope also may be used for more thorough inspection of the upper aerodigestive tract.
The examiner wears the head light or head mirror over the left eye and adjusts the headband for comfort and stability. When the light is on, the examiner closes the right eye and aims the light at the examining hand or the patient’s lips and focuses the beam to a small, bright spot. The focal point should be approximately 12 inches (30 cm) from the light. The examiner should be able to see clearly through or around the mirror apparatus. After focus is attained, the right eye is opened, and binocular vision is possible. Frequent practice makes use of a head light an easy task.
In addition to a head light, the instruments listed in Table 4-1 and shown in Fig. 4-1 should be available to facilitate a thorough otolaryngologic examination. The handheld otoscope should have either a closed head with a balloon attached to allow for introduction of air under pressure into the ear canal or an open head to enable instrumentation.
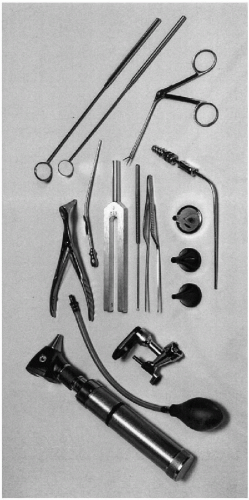 FIG. 4-1. Instruments for otologic examination include otoscopes with both pneumatic head and open head, cerumen curette, tuning fork, ear speculum, alligator forceps, and suction tip. Instruments for examination of other otolaryngologic structures include nasal speculum, laryngeal mirror, and flexible fiberoptic nasopharyngolaryngoscope (not shown). |
TABLE 4-1. Instruments used in otolaryngologic examination | ||||||||||||||||||||||||||||||||||||||||
|---|---|---|---|---|---|---|---|---|---|---|---|---|---|---|---|---|---|---|---|---|---|---|---|---|---|---|---|---|---|---|---|---|---|---|---|---|---|---|---|---|
| ||||||||||||||||||||||||||||||||||||||||
GENERAL EXAMINATION
The first part of the physical examination involves an evaluation of the face, head, and neck for symmetry and the presence of congenital abnormalities. Is the head held erect or tilted to one side? Is the face equally developed on both sides? Is there any gross asymmetry or hypoplasia of any of the facial structures? Are there any skin lesions on the face? Is the head size appropriate with respect to the rest of the body? The scalp should be inspected for skin condition, cutaneous lesions, and subcutaneous masses. The condition, texture, color, and distribution of hair are documented.
THE EAR
The structure and function of the otic structures are evaluated. The examiner begins by assessing the size, position, configuration, and general condition of the auricles (pinnae). The auricle is composed of cartilage covered by skin and a small amount of subcutaneous tissue. Among the cartilaginous ridges that give the auricle its shape are the helix, antihelix, tragus, antitragus, and concha. Anomalous development of the auricular cartilage leads to microtia or other malformations. The auricles, postauricular sulcus and mastoid region are inspected and palpated. Scars, erythema, swelling, tenderness, or masses are noted.
The external auditory canal should be inspected next (Fig. 4-2). The configuration, patency, cleanliness, and presence of drainage,
lesions, or foreign material are assessed. To assess the canal completely, it may be necessary to remove foreign material or cerumen, which may entail use of a cerumen curette (Fig. 4-3), irrigation device, suction, or forceps. The largest speculum that fits comfortably into the external auditory canal should be used. It should be inserted only as far as is necessary for adequate inspection. It is important not to injure the skin because there is very little subcutaneous tissue over the cartilaginous lateral portion of the canal and even less over the bony medial parts. To avoid patient discomfort, support the arm and stabilize the hand holding the otoscope against the zygoma (Fig. 4-4).
lesions, or foreign material are assessed. To assess the canal completely, it may be necessary to remove foreign material or cerumen, which may entail use of a cerumen curette (Fig. 4-3), irrigation device, suction, or forceps. The largest speculum that fits comfortably into the external auditory canal should be used. It should be inserted only as far as is necessary for adequate inspection. It is important not to injure the skin because there is very little subcutaneous tissue over the cartilaginous lateral portion of the canal and even less over the bony medial parts. To avoid patient discomfort, support the arm and stabilize the hand holding the otoscope against the zygoma (Fig. 4-4).
 FIG. 4-2. Insertion of ear speculum and visualization of the canal and tympanic membrane through a speculum is facilitated by gentle upward, outward, and backward traction on the auricle. |
The tympanic membrane is examined with an otoscope or a head light and ear speculum. Inspection proceeds medially, superiorly, and posteriorly. It is quite common to see a bony bulge on the anterior-inferior canal wall that partially obscures the eardrum in this region. The landmarks (Fig. 4-5), color, integrity, transparency, and position of the eardrum are documented. The condition of the overlying epithelium should be assessed, as should any bulging, retraction, or perforation of the eardrum. The mobility of the eardrum may be assessed by use of a pneumatic otoscope (Fig. 4-4). If there is a good seal between the speculum and the canal, very gentle compression of the bulb produces visible motion of the eardrum. If the eardrum does not move when air is introduced, either a mass or fluid behind the eardrum is impeding its movement or a perforation is allowing the air to traverse the eardrum.
If the tympanic membrane is intact, look for fluid behind the eardrum and document the color and translucency of the fluid. If fluid is present, there may be a meniscus, or the fluid may completely fill the middle ear space. The fluid behind the eardrum may appear to be blue or red (blood), clear yellow (serous effusion), or cloudy yellow (mucoid).
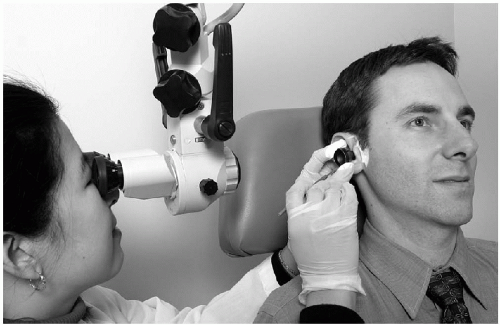 FIG. 4-3. An operating microscope is useful for instrumentation such as cerumen removal, foreign body removal, and myringotomy. It also enables precise evaluation of the external auditory canal and tympanic membrane. |
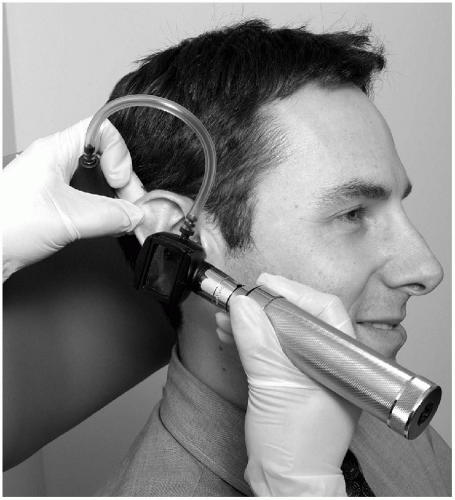 FIG. 4-4. Pneumatic otoscopy may be used to assess the mobility of the tympanic membrane. The right hand rests on the patient’s face while the other holds the auricle and pneumatic bulb. |
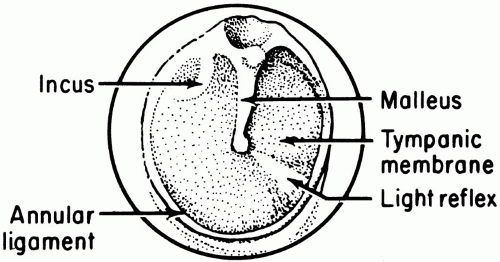 FIG. 4-5. Landmarks on the intact tympanic membrane. |
In a normal ear, the ossicles are partially visible behind the eardrum. The handle of the malleus is attached directly to the eardrum. The incudostapedial joint may be visible in the posterior-superior quadrant behind the eardrum. The condition of the middle ear mucosa may be assessed through a perforation, if one is present. If drainage is coming through a perforation of the tympanic membrane, document the color and characteristics of the drainage differentiating the cloudy, yellow drainage of purulent otitis media from the clear, watery drainage of allergic conditions. It is difficult to assess the patency of the eustachian tubes during a routine physical examination. If, however, fluid is present in the middle ear, the examiner may infer that the tube is not patent.
In examining the ear, perform hearing tests using a tuning fork with a frequency of 512 Hz. The two tests most commonly performed are the Weber and Rinne tests. The Weber test is performed by means of gently striking the tuning fork and placing it in the center of the patient’s forehead (Fig. 4-6A) or on the upper central incisors. For a person with normal hearing, the sound does not radiate to either ear. For someone with a conductive hearing loss, the sound radiates to the impaired ear. For
someone with a sensorineural loss, the sound radiates away from the impaired ear.
someone with a sensorineural loss, the sound radiates away from the impaired ear.
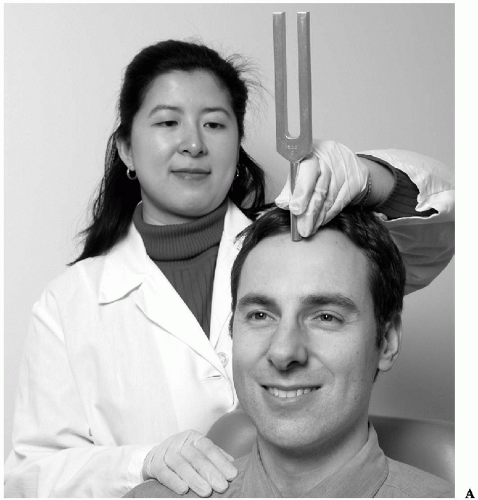 FIG. 4-6. Tuning fork examination. A: Weber test positioning of tuning fork. (continued on next page) |
 FIG. 4-6. Continued. B: Rinne test. (1) Striking a tuning fork and holding it against the mastoid tip until the sound is no longer heard (bone conduction). (2) The fork is held approximately 4 inches (10 cm) from the ear to determine air conduction. |
The Rinne test is performed by means of gently striking the fork and placing it on the mastoid tip. The patient should hear the sound quite well. When the patient no longer hears the sound, the fork is held in front of the external auditory meatus (Fig. 4-6B). The patient should continue to hear the sound at the meatus after losing it on the mastoid tip. This is called a positive Rinne result. Failure to continue to hear the sound denotes a reversal of the Rinne test (bone conduction better than air conduction) and indicates a conductive hearing loss. It is important to mask the sound input to the opposite ear with a masking device or by means of crinkling paper in front of the opposite ear.
Stay updated, free articles. Join our Telegram channel

Full access? Get Clinical Tree


