Incisionless Otoplasty surgery for lop (protuberant) ears has evolved through three major steps in technique since its inception in 1992. Improvement was seen with each progressive technical advance. The previously published 2.0 version of 2004 has undergone evolution to streamline placement of the percutaneous retention sutures. The new 3.0 version technique greatly reduces the number of operative steps required. In this article, technical instructions for the 3.0 version are explained, and multiple applications of the 3.0 procedure and the 2.0 are illustrated.
A typically used open-surgical otoplasty operation is the Mustarde procedure. This procedure can give rise to difficulties in the postoperative period. Specifically, the wide incisions and the undermining of the skin and subcutaneous tissues create a dead space with the potential for hematomas, abscess formation, and perichondritis. The retention sutures are under cartilage-spring tension until scarring partially anchors the correction. Excision of excess skin on the posterior pinna is a widely variable and subjective maneuver that can lead to tenting or bridging. To achieve a successful result, considerable postoperative bandaging and maintenance efforts are required for the patient and physician.
The Incisionless Otoplasty techniques arose from a desire to achieve excellent cosmetic effects with a limitation of complications. Incisionless Otoplasty, Version 1.0, was published in 1995 and used a new method of placing percutaneous otoplasty retention sutures. It completely removed the need for incisions and wide tissue undermining. The 2.0 version appeared in the literature in 2004 and added a new percutaneous technique for scoring and breaking the inherent pinna cartilage spring. This served to remove any bow-string–like strain on the retention sutures caused by the cartilage spring. The 3.0 version is a further development of the 2.0 version. It streamlines the retention suture application for the antihelix and broadens the anatomic possibilities for suture application extending to the conchal bowl, the lobule, and to a combined antihelical and conchal bowl correction.
Surgical technique of Incisionless Otoplasty 3.0
Antihelical Correction
A 30-gauge needle and a tuberculin syringe are used to deliver nondistorting amounts of vasoconstrictive local anesthetic agent on the anterior and posterior surfaces of the pinna. A circum-auricular injection addresses the superficial temporal and postauricular artery contributions to help achieve tissue blanching. In children, a general anesthetic is used in addition to the local agent. For surgical draping, bilateral, plastic stick-on otologic drapes are applied so that both ears are simultaneously visible for comparison. For awake patients, the otologic drapes are scrolled together above and below the face, so that the face is freely exposed. With general anesthesia, the otologic drapes are scrolled together covering the face.
Incisionless Otoplasty: step one cartilage scoring
The first surgical step is to precisely break the cartilage spring along the envisioned neoantihelical fold. A 20-gauge phlebotomy needle is used to score percutaneously the anterior cartilage surface and to create full thickness tunnels through the cartilage ( Fig. 1 ). By doing so, the cartilage spring is released and a palpably flaccid cartilage spring is noted. In this state, the neoantihelical fold can be retained in the desired aesthetic position without tension on the sutures. Additionally, the cartilage scores and tunnels will heal with scar tissue, further strengthening the correction.
Incisionless Otoplasty: step two suture placement
The second surgical step is to place percutaneous retention sutures to hold the neoantihelical fold in the new position.
The preferred suture is a braided, white, 3-0 polyester (Mersilene; Ethicon, Summersville, NJ, USA) with a cutting needle. The manufacturer’s attached cutting needle is used. Marking-pen dots on the anterior pinna surface are useful for symmetrically planning the suture loops and as intraoperative targets for the surgeon.
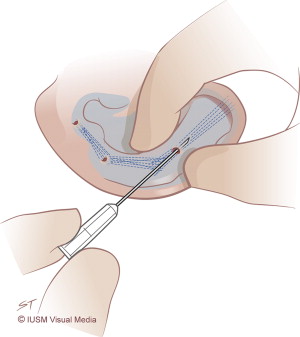
The 3.0 version suture-retention loop starts on the posterior pinna, close to the postauricular sulcus ( Fig. 2 ). The retention sutures are placed only from the posterior surface of the pinna and, unlike the 2.0 version, never emerge through the anterior side. The needle penetrates the cartilage and can be seen to burrow subcutaneously under the skin of the anterior conchal bowl for a short distance, before re-exiting on the posterior surface. A broad-based suture bite is used and the suture does not skim into the anterior skin, but stays buried next to the perichondrium to prevent any chance of skin erosion.
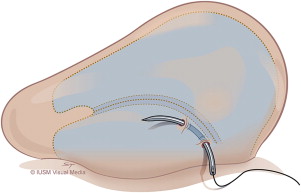
Next, the needle is redirected for a longer distance, laterally on the postauricular side, toward the chosen spot for the next suture loop short limb ( Fig. 3 ). The needle stays on the posterior surface of the cartilage, but it does enter into the perichondrium to keep the suture tacked close to the cartilage and prevent any chance of suture bridging. The process is progressively repeated until the entire loop is completed ( Figs. 4–6 ). Conceptually, there are two short limbs of the suture loop on the anterior pinna cartilage surface, and two long limbs on the posterior surface of the cartilage.


Stay updated, free articles. Join our Telegram channel

Full access? Get Clinical Tree


