The authors present a manual of transcanal ear dissection, a completely clinically focused discussion of the goals, steps, and outcomes of endoscopic dissection of the middle ear. From operating station setup through instrumentation and tasks, the reader is presented with detailed technique steps interspersed with observe notes that provide anatomic and technique pearls, such as “by removing the skin of the canal and the epithelial layer of the tympanic membrane (TM), you have largely eliminated the bleeding elements of the external ear and TM”.
Key points
- •
The endoscope allows detailed observation of the anatomy of the tympanic cavity.
- •
The anatomy of the ear canal is important as the access point to the tympanic.
- •
The Epitympanic Diaphragm separates the air containing spaces of the temporal bone into two cavities: a posterior superior mastoid/attic cavity and an anterior inferior mesotympanic/eustachian tube cavity.
- •
There are other mucosal folds that segment the air cavities and prevent pan ventilation of these spaces.
Endoscopic dissection of the middle ear
Objectives
- 1.
Develop an understanding of the endoscopic anatomy of the middle and inner ear through transcanal access.
- 2.
Develop the necessary hand-eye coordination and hands skills to perform endoscopic ear surgery.
- 3.
In the laboratory, perform the specific steps involved in tympanoplasty.
- 4.
Understand the anatomy of the cholesteatoma-bearing areas of the middle ear.
- 5.
In the laboratory, perform the exploration of all the cholesteatoma-bearing areas of the middle ear.
Workstation and Setup
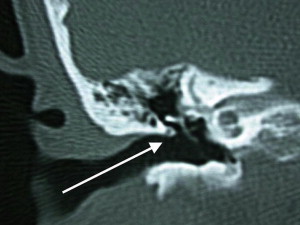
The head/temporal bone holder should be positioned in such a way that would align the axis of the ear canal with the axis of the surgeon’s vision. Given the up-sloping orientation of the ear canal ( Fig. 1 ), this would result in the surgeon’s field of view being centered on the lateral short process of the malleus rather than the umbo of the tympanic membrane (TM). The anatomic specimen should be positioned between the monitor and the surgeon. When using the 0° endoscope and during much of the dissection, the specimen’s top should be to your right for the right ear and to your left for the left ear. When using angled scopes, you should always be able to rotate the anatomic specimen around as you explore the different middle ear space. The orientation of the angled view of the endoscope should always face away from the surgeon and face the monitor.
Required Instruments
Description
- •
Round knife 45°, 16 cm, diameter: 2.5 mm
- •
Plester knife, round, vertical, 16 cm, standard size 3.5 × 2.5 mm
- •
Serrated Alligator forceps
- •
Wullstein needle, 16.5 cm, light curve
- •
Bellucci scissors, working length 8 cm, delicate, curved right
- •
Bellucci scissors, working length 8 cm, delicate, curved left
- •
House-Dieter malleus nipper, working length 8 cm, up biting
- •
House curette, 15 cm, large size
- •
Fisch adaptor, with cutoff hole, Luer cone 5.5 cm
- •
Suction cannula, angular, Luer-Lock, working length 6 cm, outer diameter (OD) 1.5 mm
- •
3 mm 14 cm, 0° Hopkins telescope
- •
3 mm 14 cm, 30° Hopkins telescope
Dissection Tasks
- 1.
- 2.
- 3.
Remove the canal skin along with the epithelial layer of TM
- 4.
- 5.
- 6.
Separate tympanic membrane remnant
- 7.
- 8.
Enlarge access to inferior retrotympanum and hypotympanum
- 9.
Start with a careful limited atticotomy
- 10.
Continue and extend atticotomy
- 11.
- 12.
Extend the bone removal anteriorly
- 13.
- 14.
Transect the neck of the malleus
- 15.
Transect the tensor tympani tendon and remove the handle of malleus
Elective task
- 16.
Dissection Tasks
Dissection Task 1: Inspection of the ear canal
It is important to spend a few minutes inspecting the anatomy of the ear canal, the TM, and whatever is visible through the transparent TM.
Observe
- i.
Many of the vessels of the TM run down from the ear canal, and they supply the TM from laterally to medially; this is very apparent living patients but might not be obvious in an anatomic specimen. So, by removing the skin of the canal and the epithelial layer of the TM, you have largely eliminated the bleeding elements of the external ear and TM ( Fig. 2 ).
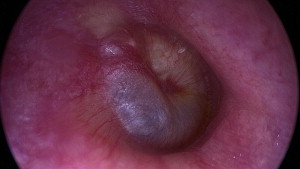
Fig. 2
Right ear: Endoscopic view of the TM in a right ear with cholesteatoma visible behind the TM. Note the blood vessels arising from the ear canal and supplying the TM.
- ii.
The axis of the ear canal is angled superiorly and the scutum lies at the bottom of the canal (see Fig. 1 ).
- iii.
Observe the location and extent of any anterior overhang. Also, please note that in many specimens there is also an inferior overhang ( Fig. 3 ).
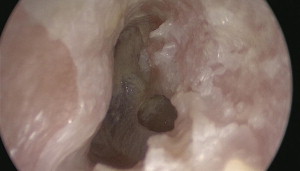
Fig. 3
Left ear: The view through the endoscope of an anatomic specimen with a small perforation. Note the size and location of the significant anterior overhang.
Dissection Task 2: Outline vascular strip
Use the round knife to make the medial cut just 2 to 3 mm away from the annulus and then use the Plester flap knife to extend the cuts laterally.
Observe
- i.
The fibrous annulus of the TM almost disappears in the upper posterior part of the TM (see Fig. 2 ; Fig. 4 ).
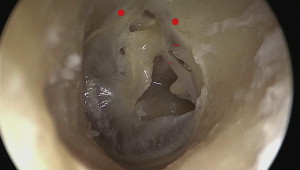
Fig. 4
Left ear: The skin of the canal has been removed along with the epithelial layer of the TM. The ear canal has been enlarged. Note the limits of the fibrous annulus ( red circles ); CT, chorda tympani; PML, posterior mallear ligament.
- ii.
You need to palpate the bony edge of the middle ear before you make your deep cut. It is usually the fibrous annulus that is visible. The lack of the fibrous annulus superiorly and the injection of the ear canal with lidocaine (Xylocaine) and epinephrine would result in an engorged vascular strip and a lack of definition of the bony annulus rim separating the ear canal from the middle ear
Dissection Task 3: Removal of the canal skin along with the epithelial layer of TM
Using the round knife, a circular lateral incision is made that connects the two limbs of the vascular strip incision across the anterior canal in preparation for the removal of the ear canal skin. Please note that the incision needs to be lateral enough to any anterior bony overhang. Then the skin of the ear canal should be elevated under direct vision. All overhanging bone is curetted away as we proceed medially in the canal. Care should be taken to avoid the temporomandibular joint. As the annulus is reached, it should not be elevated; the skin of the canal should be elevated in contiguity with the epithelial layer of the TM. This procedure is done either by running the round knife over and in the direction of the annulus inferiorly or by using a cuffed forceps to pull down the epithelial layer off of the lateral short process of the malleus superiorly. Attention should be paid to maintaining the fibrous annulus tethered to its bony groove.
Observe
- i.
The glistening white annulus and fibrous layer of the TM (see Fig. 4 )
- ii.
The friable skin and epithelial layer of the TM (compare Figs. 3 and 4 )
Dissection Task 4: Enlarging the ear canal
The ear canal should be curetted out in all directions to maintain a full and simultaneous view of the annulus and the ear canal with a 0° scope. Given the fact that the bony annulus separating the middle ear from the ear canal is very variable in relationship to other structures, you need to consider the possibility of a low dura, anterior sigmoid, facial nerve, and a high jugular bulb as you enlarge the ear canal ( Figs. 5 and 6 ).
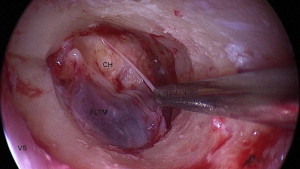
Fig. 5
Right ear: The canal wall is curetted to obtain a full view of the tympanic ring in one view using the 0° endoscope. CH, cholesteatoma; FLTM, fibrous layer of tympanic membrane; VS, vascular strip.
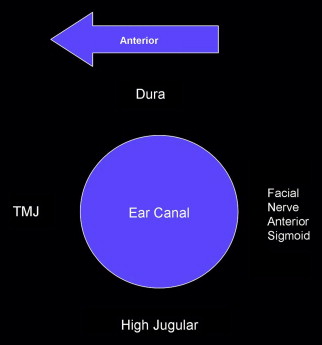
Fig. 6
The left ear canal with the surrounding structures that need to be considered when enlarging the ear canal.
Dissection Task 5: Elevation of the annulus up to 1 and 6 o’clock
Using the cuffed forceps, pull down the fibrous layer of the TM off of the upper part of the handle of malleus and out of the groove of the bony annulus and deflect the elevated TM anteriorly.
Observe
- i.
The posterior mallear ligament overlying the chorda tympani and almost parallel to it ( Fig. 7 )
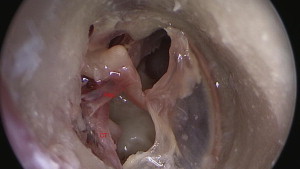
Fig. 7
Right ear: Fibrous layer of the TM is pulled down off of the handle of malleus revealing the posterior mallear ligament (PML) and the chorda tympani (CT). TMJ, tempromandibular joint.
- ii.
The undersurface the TM and the handle of the malleus
Dissection Task 6: Separate tympanic membrane
Using a Wullstein needle, the TM remnant is separated from the handle of malleus from the lateral short process of the malleus and downward toward the umbo. Then using angled Bellucci scissors, the TM remnant is separated from the umbo ( Fig. 8 ).
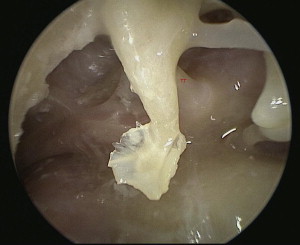
Fig. 8
Left ear: The fibrous layer of the TM along with the fibrous annulus is removed and separated from the handle of malleus. TT, the tendon of the tensor tympani.
Dissection Task 7: Take down the bony annulus posteriorly to gain full access to the facial recess and sinus tympani
Make sure that the posterior canal wall is almost flush with the pyramidal process ( Fig. 9 ).
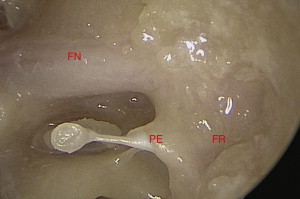
Fig. 9
Left ear: Using transcanal endoscopic access and after removal of some bone, the facial recess seems to be less of a recess and more of a slight depression just superficial to the pyramidal eminence and the vertical segment of facial nerve. FN, facial nerve; FR, facial recess; PE, pyramidal eminence.
Observe
- i.
Using a 0° scope, the facial recess is very accessible and forms a small depression on the posterior wall of the tympanic cavity (see Fig. 9 ).
- ii.
Using the 30° scope, position the specimen so that the posterior aspect is away from you and orient the angle of the endoscope to look away from you. Inspect the retrotympanic anatomy ( Fig. 10 ).
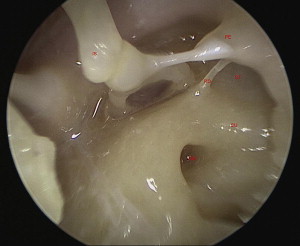
Fig. 10
Left ear: View of the retrotympanum. IS, incudostapedial joint; PE, pyramidal eminence; PO, ponticulus; RW, round window; ST, sinus tympani; SU, subiculum.
- iii.
Observe the pyramidal eminence and look for possible subpyramidal space ( Fig. 11 ).
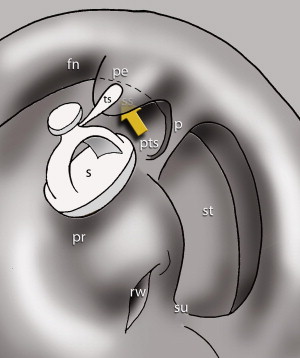
Fig. 11
Left ear: Subpyramidal space ( arrow ). fn, facial nerve; p, ponticulus; pe, pyramidal eminence; pr, promonitory; pts, posterior tympanic sinus; rw, round window; S, stapes; ss, subpyramidal space; st, sinus tympani; su, subiculum; ts, stapedius muscle tendon.
- iv.
Observe the entry point for any subpyramidal space. Study the different possible variations ( Fig. 12 ); inspect your specimen and compare it with the other specimens being dissected. Note that in the specimen being dissected here, it is an extension of both the sinus tympani and the posterior tympanic sinus ( Fig. 13 ).

Fig. 12
Left ear: The different possible morphologies and communications of the subpyramidal space with surrounding structures. ( A1, A2 ) Different perspectives of a subpyramidal space that communicates with both the posterior sinus and the sinus tympani. ( B1, B2 ) Different perspectives of a subpyramidal space that is really an extension of the sinus tympani. ( C1, C2 ) Different perspectives of a subpyramidal space that is really an extension of the posterior sinus. Red Arrow , the subpyramidal space is formed by expansion of pneumatiztion of the either the sinus tympani or the posterior sinus. fn, facial nerve; Pe, pyramidal eminence; pr, promonitory; pts, posterior tympanic sinus; rw, round window; ss, subpyramidal space; st, sinus tympani; su, subiculum.
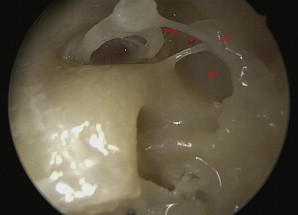
Fig. 13
Left ear: Note the entry points of the subpyramidal space in this specimen is type A, connecting to both the sinus tympani and the posterior tympanic sinus. Subpyramidal space ( arrow ). PE, pyramidal eminence; PTS, posterior tympanic sinus; ST, sinus tympani.
- v.
Study the possible different variations in the shape of the sinus tympani ( Fig. 14 ).
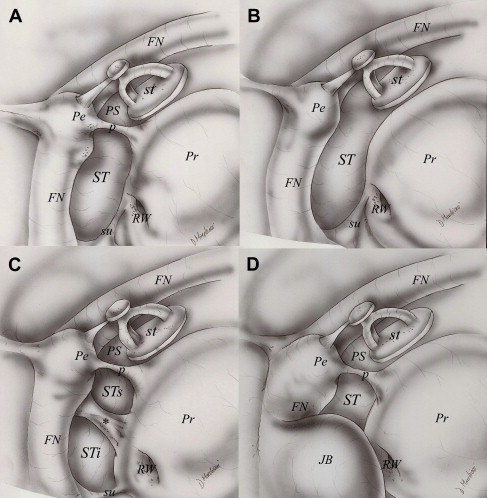
Fig. 14
The possible different morphologies of the sinus tympani. Ridge separating the sinus tympani into 2 parts ( asterisk ). FN, facial nerve; JB, jugular bulb; P, ponticulus; Pe, pyramidal eminance; Pr, prominotory; PS, posterior sinus; RW, round window; st, stapes; ST, sinus tympani; STi, inferior sinus tympani; STs, superior part of sinus tympani; su, subiculum.
- vi.
Study the classification of the depth of the of the sinus tympani ( Figs. 15 and 16 ).
Fig. 15
The different types of sinus tympani based on depth and extensions in relation to the facial nerve. Ch, cochlea; Fn, facial nerve; Pr, promonitory; Sn, sinus tympani.
Fig. 16
Type C sinus tympani. Black arrow indicates posterior extension of ST with respect to the third portion of the facial nerve. cc, chordal ridge; ct, chorda tympani nerve; Fg, lateral tympanic sinus; Fn, facial nerve; Fs, facial sinus; In, incus; Ma, malleus; p, ponticulus; Pe, pyramidal process; PS, posterior sinus; s, stapedial tendon; ST, stapes; su, subiculum.
- vii.
Observe the shape and depth of the sinus tympani in your specimen. Try to classify (with palpation if necessary) the type of sinus tympani in your specimen (see Fig. 10 ).
- viii.
Observe the ponticulus and its possible variations ( Fig. 17 ).
Fig. 17
Different morphology of the ponticulus. ( A ) Ridge ponticulus, ( B ) incomplete ponticulus, and ( C ) bridge ponticulus. Fn, facial nerve; In, incus; p, ponticulus; Pe, pyramidal process; Pr, prominotory; PS, posterior sinus, s, stapedial tendon; ST, stapes; Su, subiculum.
- ix.
Try to inspect the round window membrane and niche. Identify the tegmen of the round window niche and the anterior and posterior pillars ( Fig. 18 ).
Fig. 18
Right ear round window niche. Round window membrane ( arrows ). AP, anterior pillar; PP, posterior pillar; TE, tegmen.
Dissection Task 8: Take down any inferior overhang and enlarge the access to the inferior retrotympanum and hypotympanum, then inspect the hypotympanum
This procedure should be done with a 30° scope, with the angle of the endoscope and the posteroinferior part of the specimen facing forward away from the surgeon ( Fig. 19 ).
Fig. 19
Right ear: Summary of the anatomy of retrotympanum and hypotympanum. Finiculus appears as a ridge of bone arising from the anterior and inferior lip of the round window separating inferior retrotympanum from hypotympanum. Subiculum separates superior from inferior retrotympanum. The arrows represents Retrofacial extentions of the sinus tympani and subtympanic sinus. Right side. ap, anterior pillar; cp, cochleariform process; et, eustachian tube; f, finiculus; fn, facial nerve; jb, jugular bulb; ow, oval window; p, ponticulus; pe, pyramidal eminence; pp, posterior pillar; pr, promontory; rw, round window; st, sinus tympani; ss, sinus subtympanicus; su, subiculum; sty, styloid eminence; te, tegmen of round window niche.
Observe
- i.
Study the anatomy of the subiculum and its different variations ( Fig. 20 ).
Fig. 20
Right ear: Anatomic variations of the subiculum. ( A ) Ridge subiculum. ( B ) Bridge subiculum. ( C ) Absent subiculum, sinus subtympanicus confluent to the sinus tympani. ( curved arrow ), “dam like” subiculum; ( straight arrow ), “bridge like” subiculum. cp, cochleariform process; et, eustachian tube; fn, facial nerve; jb, jugular bulb; ow, oval window; p, ponticulus; pe, pyramidal eminence; pr, promontory; rw, round window; ss, sinus subtympanicus; st, sinus tympani; su, subiculum; sty, styloid eminence; rw, round window.
- ii.
Observe the subiculum, the inferior limit of the sinus tympani, and the superior limit of the sinus subtympanicus. Identify the type of subiculum in your specimen ( Fig. 21 ).
Fig. 21
Left ear: Overview picture of the tympanic cavity with special attention to the retrotympanum. CA, carotid artery; FN, finiculus; FN, facial nerve; HC, hypotympanic air cell; RW, round window; SE, styloid eminence; SS, sinus subtympanicus; SU, subiculum.
- iii.
Identify the finiculus, the inferior limit of the sinus subtympanicus. Note the type of finiculus in your specimen ( Fig. 22 ).
Fig. 22
Anatomic variations of the finiculus. Right side. ( A ) Ridge finiculus. ( B ) Bridge finiculus. ( C ) Absent finiculus. cp, cochleariform process; et, eustachian tube; f, finiculus; fn, facial nerve; jb, jugular bulb; ow, oval window; p, ponticulus; pe, pyramidal eminence; pr, promontory; rw, round window; ss, sinus subtympanicus; st, sinus tympani; su, subiculum; sty, styloid eminence.
- iv.
Observe the styloid eminence, basically delineating the vertical segment of the facial nerve (see Fig. 21 ).
- v.
Look for the height and size of the jugular bulb.
- vi.
Take a wide field view and inspect the infracochlear space. If this area is well pneumatized, you can almost see the curvature of the basal turn of the cochlea (see Fig. 21 ).
Dissection Task 9: Initiate a careful limited atticotomy
Make sure that you stop at the insertion point of the lateral incudomallear ligament and the lateral mallear ligament on the medial aspect of the scutum. This procedure needs to be done carefully and in small steps to preserve these friable ligaments.
Observe
- i.
The shape of the lateral ligaments and how they form, along with the neck of malleus the roof and medial aspect of the Prussak space ( Fig. 23 ).
Fig. 23
Left ear: PML, posterior mallear ligament; PR, Prussak space.
- ii.
Observe that these ligaments form the lateral part of the epitympanic diaphragm that close up the area in between the scutum and ossicles and prevent any ventilation of the attic via this lateral route. Observe the straight insertion points on the ossicles of the lateral incudomallear ligament and the curvilinear insertion of the lateral mallear ligament ( Fig. 24 ).
Fig. 24
Left ear: The relatively straight insertion line of the lateral incudomallear ligament (IML) and the downward sloping insertion line of the lateral mallear ligament (LML).
Dissection Task 10: Continue and extent the atticotomy
Interrupt the lateral mallear fold and curette the anterior part of the scutum and expose the malleus while preserving the incudal part of the lateral incudomallear folds ( Fig. 25 ).
Fig. 25
Left ear: view of the anterior epitympanic space (AES) after removal of the scutum. Note that there is no direct ventilation anteriorly to the eustachian tube.
Observe
- i.
Look anterior to the head of malleus for the anterior epitympanic space (see Fig. 25 ). Observe how in most specimens, this space is separated from the supratubal recess by the cog and the tensor folds, which bridge the space between the tensor tympani tendon and the cog.
- ii.
Look for the presence of Sheehy’s cog and complete tensor folds, separating this space from a supratubal recess ( Fig. 26 ).


